Pub Battles Campaign Game

This is a work in progress, posted so others may view and give feedback. The intent of this campaign system is to allow the play of a campaign game that gives broader scope to games then simply to win that one battle. This is not historical.

Campaign turn order:
Winter / Orders-Move Armies-Combat-Build
Spring / Orders-move BT-Move Armies-Combat
Summer / Orders-move BT-Move Armies-Combat
Fall / Orders-move BT-Move Armies-Combat

Orders – To move, simply write the name of the adjacent node that the HQ is moving to.
There is no limit to the number of HQs moving into a Node.
All BT may move each turn, but only one BT may move between any two nodes per turn.

Move – HQs and LPs must attempt to follow the orders they are given, as fully as possible. Orders that contravene the rules count as No Orders.
Units under No Orders may not move, and if attacked will automatically retreat, if able, or grant the enemy one Surprise turn (only the enemy draws chits!), if a bettle is fought..
Orders – HQs may be ordered to Move to another Node, or Hold the Node they occupy. A unit may be given No Orders, which mean they remain in their Node, but are expected to retreat and not risk their Army if attacked.

Build – Build one Corps and one Logistics Point (LP), per Build Area you control. Some, none, or all, must be placed in any home Build area.

Corps Builds – One Corps per Build Phase may be Cavalry.
Infantry Corps – 1 hussar, 3 infantry, 1 artillery.
Cavalry Corps – 1 horse artillery, 1 hussar, 1 dragoon, 1 cuirassier.

Reorganizing – During the Build phase, the armies may be reorganized. All blocks in an area may be reassigned to different HQs. Additionally:
2 regular blocks of any type may be combined into 1 Elite block and 1 militia block, of the same type.
1 regular block of any type may be swapped for 2 militia of the same type.

Orders – HQs in the same area may first reorganize, blocks may be assigned to any HQ, and HQs may be created or eliminated as needed. An HQ must contain at least 2 blocks. A new HQ begins with a rating of 3. If its command contains any Elite, +1 to the score. Each player gets one Army HQ with a rating of 4 to begin the game. After any battle, a player who wins a decisive victory gets to increase a single HQ’s rating by +1, to a maximum of 5.

Setting up the map

The map is a series of interconnected Nodes. Each Bold Node is worth 1 Build.

Each node may normally only hold one LP. A node with a Supply Depot may contain 3 LPs. Each home Node contains a Supply Depot. A Supply Depot may be created on any Node by replacing a LP with a depot Cube. If an army begins its turn with an enemy SD/BT, it may Capture an LP if it doesn’t already have one, it may move one remaining LP (if able) to an adjacent Node, and it must destroy the excess.

Setting up a battle

All of the HQs on a single node compose an army. Each army can have one LP on its node. LPs may only move one at a time between nodes.

Idea: 1 Logistics Point is worth 3 BTs. Only one LP per Node. No Depots. So 1 LP can move with an army, but you may never have more than one LP per Node, except when multiple armies enter the same Node. As soon as an army Occupies the same node as a LP, it may convert the LP to 3 BTs. After a battle, the BTs are considered consumed.

When two armies end their turn on the same node, a battle will ensue. If opposing armies would meet on a road connecting two nodes, the side with Cavalry Scouting Superiority (CSS) drives the opposing army back. If neither side has CSS, compare the total number of infantry and cavalry blocks, if still equal, highest die roll decides. The army without CSS must setup within 1 mounted move of the side of the map they entered from. The side with CSS may setup within 1/3 of the the side they enter from, or may enter on turn one along either of the remaining sides.

If one army is attacked while Occupying a node, it begins set up anywhere on the map, at least 1/3 mounted move from any map edge. The side it entered from is its base side. The attacking force must enter along the opposite side unless it has CSS, in which case it may enter anywhere on any of the three non enemy base sides, and may begin within 1/3 Mounted move of the base side it enters the node from, remaining 1/3 mounted move away from any enemy forces.

If multiple friendly armies are entering from different Nodes, one army is considered the main army (players choice) and the remaining armies enter along the Node edge they are arriving from, on a turn determined by a D6. CSS makes no difference for additional armies, so it may be in your best interest to consider your army with the most cavalry to be your main force.

Cavalry Scouting Superiority (CSS) – Points are awarded based on total cavalry blocks:
Hussars 3 per block
Dragoons 2 per block
Cuirassiers 0 points (Cuirassiers were not used for scouting), Hussars are better at scouting, but dragoons are better on the battlefield.


Most Recent Homebrew

As with all my Homebrew rules, these are ways I find that enhance the system, with out adding weight to the rules. This includes and replaces any previous homebrew rules I’ve used.

Artillery – Spent Artillery may fire.

Originally, pre Baggage Train Rally rule, blocks just rallied from spent automatically if they didn’t move. So the proscription from bombardment felt right. Now, with an unpacked Baggage Train required to rally, it is too harsh. If you don’t rally your artillery, it is still very vulnerable, just not nearly useless! Instead of being a new rule, this is just eliminating an old rule!

Cavalry – Foot retreating from mounted are eliminated.

It just feels wrong to have mounted charge foot, and then have them pull back while the cav just stands there!

Infantry – Supporting infantry blocks may choose to suffer any of the hits of the unit they are supporting.

This makes more sense when Infantry are guarding Artillery, or if you imagine the two defending blocks half as wide and double deep. You can also imagine elite troops, or Grenadier Regiments, “stiffening” the line by ignoring the first hit.

Kriegspiel style Artillery in Pub Battles

I believe that with the addition of the requirement for an unpacked Baggage Train to Rally from spent, that the proscription against spent artillery bombarding is too much.

New Artillery rules:

Spent artillery may bombard.

New support rules.

Each hit may be applied to either the front, or the supporting block, in combat (owner’s choice). Note that only infantry blocks can support in combat!

I want to make sure these feel right, and don’t open up any loopholes.

Let me know what your reservations might be, or why you think this might be inappropriate. 

The Measure of a Commander

Let’s take a moment to examine measuring movement, and how exact a player needs to be.

The first thing to consider is how exact are the movement rates. They are, after all, based on Kriegspiel movement rates, as determined by officers of the time. I definitely think this makes it a great place to start, but there are two huge areas of “fudginess” that place a limit on how exact those movement rates can be considered to be.

The first is that every foot and every mounted block moves the same. If a block is travelling the same straight path a few turns in a row, then it might be considered to be moving the full 90 minutes of a turn (one movement stick). A similar block might receive new orders. One can imagine the formation commander interpreting the order, issuing new orders to his command, who then might have to react to a complete change of plans, who might need to verify the orders, get their men moving in the new direction, maybe scouting the terrain to determine the best path (more on that in the second point), move to the new location, where they might possibly be involved in combat, which itself requires some further maneuver and giving/interpreting of orders, all that, and they too can move one movement stick in a turn.

The second consideration is the terrain penalties. If a block moves through any terrain that reduces it’s movement, say a grove of trees wider than 1/2 a block, or moves the entire time through woods and over hill and dale, it loses one third. This is not some arbitrary amount, this is how the Kriegspiel rules work. Such an adjustment was considered “close enough.” The terrain itself can be varied. Are there wide paths through the woods, or are they thick and almost impenetrable? How steep is that hill? does it include cliffs, washouts, or large boulders (great for cover, impossible for artillery)? In the grand scheme of things, when you are talking about moving a few thousand men, such variables get handled, and Pub Battles docks the formation a third. That is “close enough.” For everything else, there is the chit draw to determine who might have got where, and who might have outguessed their opponent.

One should be satisfied with “close enough,” because it is a fact of life that the map and blocks are going to get jostled. When I’m moving, I use a divider and walk it out however far it says I can go, and that’s where I move to. If I come to the end of my move and am close enough have interlocking Fields of Fire, I just go ahead and move to contact, or stay out of the FoF. Battlefields are fluid and chaotic, and within reason this allows a little slippage in measurement. How much? Enough to allow smooth play, but not so much as to allow one to game an advantage. Gentlemen’s rules.

Almost Written Orders

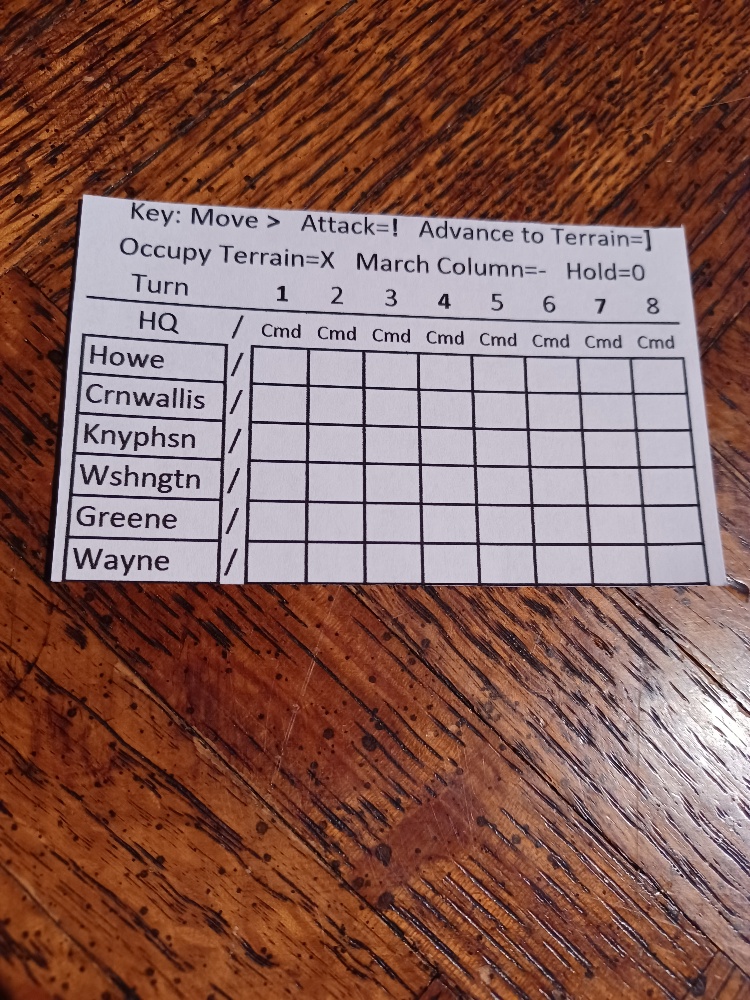
First draft of Command card

This is my work in progress of using a simple card to track orders. Orders are noted by using symbols, just add a symbol to the box and your orders are written. Boom! Simple.

At the beginning of a game, the orders for that turn are written first, then Chits are drawn. After that, the orders are written at the end of the turn, prior to the next. There are six orders with their accompanying symbols Bold:

Attack ! The command will move in one direction as far as possible.

Move > The command will move in one direction as far as possible, but will not end with an enemy in its FoF.

Occupy Terrain X The command will occupy the next terrain feature.

Advance to Terrain ] The command will advance to the next terrain feature, but will not end with an enemy in its FoF.

March Column – The command will move to a road, enter March Column, and move along that road. If already on a road, it will remain in March Column the entire turn. If a command is already in March Column and is given a different order, it may move any distance along the road, but must end its turn out of March Column and in compliance with the order. Commands in March Column will follow the lead unit.

Hold 0 The command will hold its position. This may involve attacking. It may retreat from combat.

As can be seen, the orders are of the most general type. If a command moves, it must move in one direction, blocks may make one free facing change, if desired. This is intentionally unwieldly, thus making the ballet-like moves, so often seen in many games, impossible.

A command role may be used to Alter Turn Order, as per normal.

A successful command roll may be used to ignore an order and move however the player wishes (Personal Initiative), but if this is done, then the next orders must be written in the box two turns out, so the command spends one turn without orders. A command without orders may move none of its blocks, but they may rotate.

A charge may be executed regardless of orders.

These rules do not simulate written orders, but they do simulate the awkwardness of trying to command an army from a distance, as opposed to reaching down out of the sky and moving with perfect control and knowledge of the enemy’s positions. It does not simulate written orders, but it does simulate the feeling of written orders. For an even more authentic feeling, begin with two turns of orders written, and at the end of the turn write orders for the turn after next, so at the end of turn one, you write orders for turn three. This simulates the delay of receiving reports from commanders, writing new orders, and then sending those out to them.

Leader Casualties

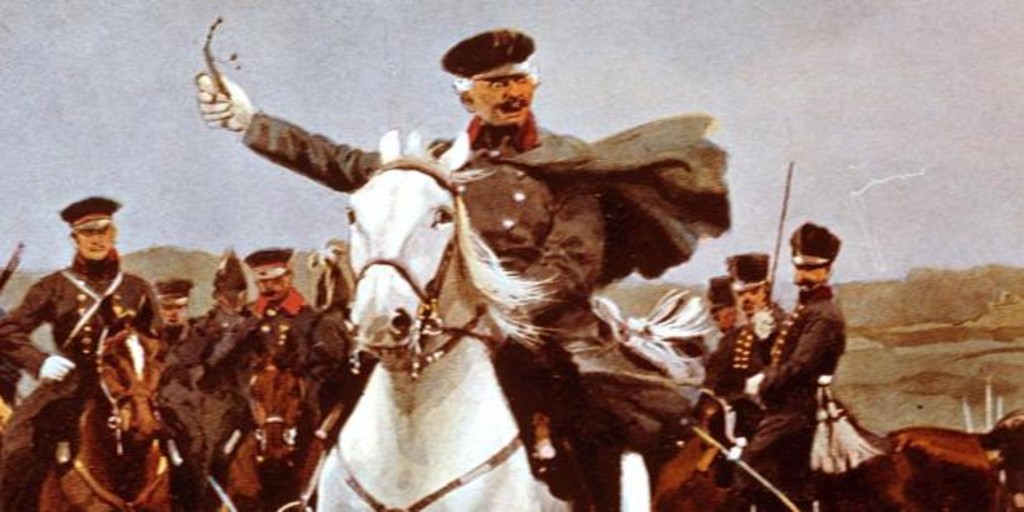
Blucher!

It has been an oft requested feature to simulate leader casualties. Ultimately, in the big picture of things, leader casualties rarely had an effect on the immediate battle. Sometimes a high level leader could effect the army, such as the loss of Stonewall Jackson, but that was the exception, not the rule.

In Pub Battles we have come up with an optional way to simulate this, that I think is pretty fun. I don’t know if I’d call it “realistic,” but if the point is to have fun, no harm is done.

To involve a leader(HQ) directly in combat, simply place it on top of a block that is adjacent to the enemy. That block now adds one to its combat rolls, but if the enemy rolls a six in combat, then there is a chance the HQ gets eliminated. For each hit suffered in a round, roll a die, if a 1 is rolled, the HQ is removed.

Note that removing the HQ still allows the chit to be drawn, and the Corps to move, but they now can only attack if the Army commander is within command range. Obviously, they cannot roll to alter turn order either.

This usually has a subtle effect on the army, just like a leader loss should. One Corps leader lost can be reasonably accommodated for, but if you lose two or more, it can be a problem. It also gives the occasional extra leader (like Blucher at Waterloo) a purpose beyond providing additional combat command. It makes me want to add a Ney block at Waterloo!

While there are plenty of good reasons to add this rule to the game, I’m not sure it is something I will use much. My guiding principle is “Does the game work without it?” If the answer is yes, then it is followed up with “Is it significantly improved by this addition? Baggage Trains passed both the hurdles with flying colors. I’m not yet convinced that this, or any, Leader Casualty rule, does.

In my last game of Waterloo, it did play a significant role. The British Bags were exposed and the Guard was fixed to assault. Picton drove off the first attempt, and fell in the effort, and Uxbridge with the Household Cavalry held off versus two blocks of Guards Cavalry charging, and two blocks of II Corps infantry in the combat phase. Very exciting, very dramatic final turn.

Here is the video:

Pub Battles Victory Conditions

Victory Conditions are one of the toughest things to develop in wargaming. Do you base it on what historical commanders’ objectives? Should players be tied to what their historical counterparts objectives, which may have changed during the battle? Gettysburg was fought because that’s where Gettysburg was, but after day 1, it was nothing more than geographical point of reference. It certainly didn’t figure into the combatant’s strategy.

I like Pub Battles use of Baggage Trains. It lets the players themselves decide where the key victory locations are going to be. What about losing valuable units? We on the design team have been asked to consider how this might be addressed. At its simplest, we all agree that it should be something that players can discuss over a few pints after the game. History is still trying to decide, and redefine, who won any given battle. It is a lot more complicated a thing than is first apparent.

My personal opinion is that it should be somewhat blended between points and conditions. It should be obvious so folks know what they’re fighting for, yet allow for shades of differences. When does a victory become too pyrrhic?

I have proposed this:

Decisive. 50% Infantry losses or, contacting an enemy Baggage Train at the beginning of a combat phase. Rout.

Moderate. If the enemy packs up an unpacked Baggage Train. Forced Back.

Most Victory Points. If none of the above conditions are met by the end of the game, then add up points for enemy units destroyed.

Without the victory point option, there is no reason not to sacrifice cavalry and artillery units to save infantry units. With the victory point option, sacrificing those valuable units only becomes worth it if the win is secured by forcing the enemy to forfeit the field of battle. If it were only points, then defense becomes supreme. It takes experience to gain a feel for what is worth it.

The other great reason for this solution is it allows a metric for determining a victor in tournaments, where a definite winner is necessary. In “friendly” games, if no clear winner is decided by the first two means, then the points remain for bragging rights, but like many of history’s battles, the winner may be forever a matter of opinion.

What do you think?


Complex Combat Solution

How to resolve complex combats is an issue in most game systems, including Pub Battles. I have come up with a simple and definitive solution. It comes from my training as a mathematician (I have nearly mastered basic algebra). What I do know is that when combining fractions, you must reduce to lowest terms. In Pub Battles, the lowest terms in complex combats are two opposing blocks. Therefore:

1. Every combat is first reduced to two combatants.

2. Each combat is resolved entirely before another combat begins.

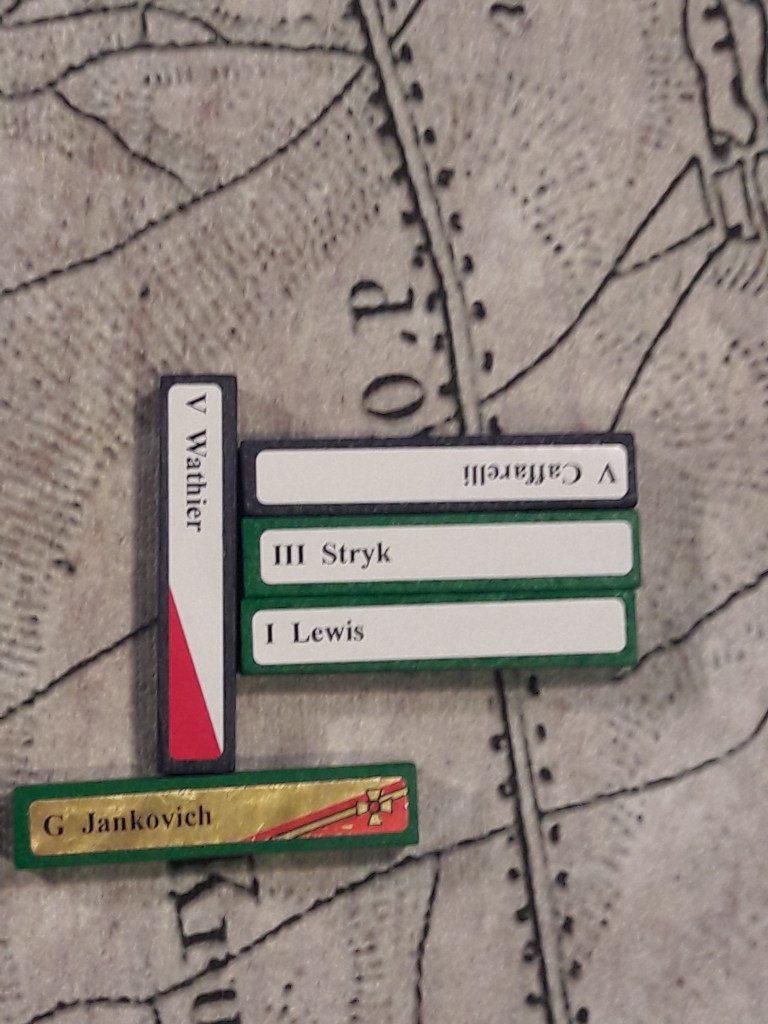
A complex combat.

The rules for each Scenario define which side decides the order of combat. As you will appreciate, this becomes significant. The side which gets to decide the order of combats will be referred to as the Tactically Dominant side.

In the above combat, the French are Tactically Dominant, and will likely choose the Wathier/Stryk combat first, if Stryk is eliminated or retreats, then Lewis has the option of advancing to continue the same combat. In other words, the combat is not complete, and no other combat can begin, until the original combat is resolved.

If Wathier wins the combat, there is still the combat between Wathier and Jankovich which will have to be resolved before the end of the combat phase, although it does not need to be the very next resolved.

If the Russians had Tactical Dominance, then it is likely that the Wathier/Jankovich combat would get resolved first. If Wathier lost that combat (likely, since he’s flanked) then Caferelli would be on his own versus Stryk and Lewis.

The other advantage to choosing the order of combat is already part of the rules. The rules say when an army reaches 50% losses, it breaks. The rules don’t specify “at the end of the turn,” so it can be interpreted as immediately. In close games, like my last Marengo game where both sides were reduced below 50% in the same combat phase, choosing which combats go first can stack the deck in your favor. This seems completely plausible when pairing off a commander like Melas, with Napoleon!

Does this unbalance the scenarios? I would argue that it does not. First of all, complex combats are not common. Second of all, the players are aware of how the combats get resolved. A commander knows the limitations of certain troops, as well as what can be expected of certain troops. Pub Battles thrives on asymmetric battles. Few would call Brandywine a fair fight, but most would agree it is a fun fight. No one is ever guaranteed to win, but how much sweeter is victory to the underdog! A fair fight that usually ends in a stalemate is a pretty dull affair.

Alt Austerlitz (Schrödinger’s Napoleon)

I really like Pub Battles Austerlitz, especially with the variable French setup. Are the French as weak as Napoleon says? The Austrians must attack as though they were, if they wait too long to find out, then it might be too late.

For enthusiasts like myself, after numerous plays there becomes an optimal French option, just bring on the Guards and all you need to win is not to lose big.

To keep the game exciting, I use a certain variation on the suggested setup. I can not take sole credit for this, it is mostly a particular variation on the setup that could be chosen. It is also optimized for solo play.

The French player has two options, bluff, or all in. The French always have Soult, Lannes, and Davout (III, IV, and V, Corps),. Alternatively, they can bring on Napoleon, the Guard, Bernadotte, and Murat (everybody). There is no option to bring on just one other Corps.

On turn one, the French player adds Napoleon’s HQ to the cup. He must make a note if it is the real Napoleon, or just a decoy. He does not have to reveal anything until the HQ is seen by the enemy. So far this is exactly one of the suggested options. The difference is that IF the French player does not bring on everything, then all that is available are the first three Corps. Not even Napoleon is there!

It is assumed that if Napoleon isn’t there, then he has come up with a different plan, and needs the rest of his army to pull it off. Whatever he has planned won’t work if his other forces don’t last the day at Austerlitz. He doesn’t need them to win, he just needs them to tie down those Allied forces.

If you are playing solo, it is called “Schrödinger’s Napoleon.” Like Schrödinger’s cat, Napoleon is both there, and not there, until you examine the HQ. When the HQ comes within the Allied LOS, roll a die. On a 4+ Napoleon is there with the rest of his army. Otherwise, only the first three Corps are on the map. If you find it difficult to play as though you didn’t know, then this option solves that.

The biggest difference between this and the official rules, is that the official rules allow Napoleon to appear with one other Corps, and the Austrian must still win decisively, or lose the game. I feel it is tipped too much in Napoleon’s favor if he appears with the guard (besides, the Guard is always with Napoleon), and all he has to do is not lose decisively to win. At least, that’s how it is for me after many, many, plays.

As always, let me know how this works for you!

New Rules on the discussion board (in playtesting)

Marshall Barrington, the system’s designer, has been reviewing the original Kriegspiel rules for his new book on Kriegspiel for modern audiences.

Although Pub Battles emulates Kriegspiel, it does not mirror it. Pub Battles creates a way to play Kriegspiel without an umpire, and focuses even more on command. Most of the Kriegspiel rules are a GM’s guide to running a Kriegspiel battle. Playing Kriegspiel is fun and easy. Running Kriegspiel is daunting.

However, Marshall has garnered some nuggets of wisdom from the original designers of Kriegspiel, things about how combat really went down on a 19 century battlefield. They fought in the Napoleonic era, they didn’t have to rely on other’s accounts.

There are many things that Pub Battles glosses over because the blocks represent divisions. In a sense, it is most accurate to compare Pub Battles to a divisional hex and counter wargame. The blocks tend to make one think of regimental level units, but that is inaccurate! The labels on the blocks tend to make one assume that is the exact unit represented, that is also inaccurate. The labels add color and drama, but that is all. Each block represents between 1000+ to 7000+ men (half that for cavalry). That’s a lot of wiggle room! When designing a Pub Battles scenario, the critical issue is what feels right, not what exactly is there.

Cavalry has never felt quite right to me. Cavalry was to 19th century armies what armor was to WWII armies, but it didn’t feel that way in Pub Battles. With all that in mind, these rules are under consideration:

  1. Any block may retreat before the first round of combat from an infantry block without becoming spent.

2. Foot (infantry or artillery) that is required to retreat from Mounted is eliminated instead.

3. Artillery rule that was here has been discarded.

Note that dragoons can/will be handled differently. As with any cavalry rules, you always want to read scenario special rules.

As always, the focus is on keeping Pub Battles a fast playing, smooth, command focused, simulation.